A mic test is the fastest way to check whether your microphone is working before a meeting, voice call, recording, or gaming session. Many people face situations where they start speaking but others cannot hear them because the mic was never tested.
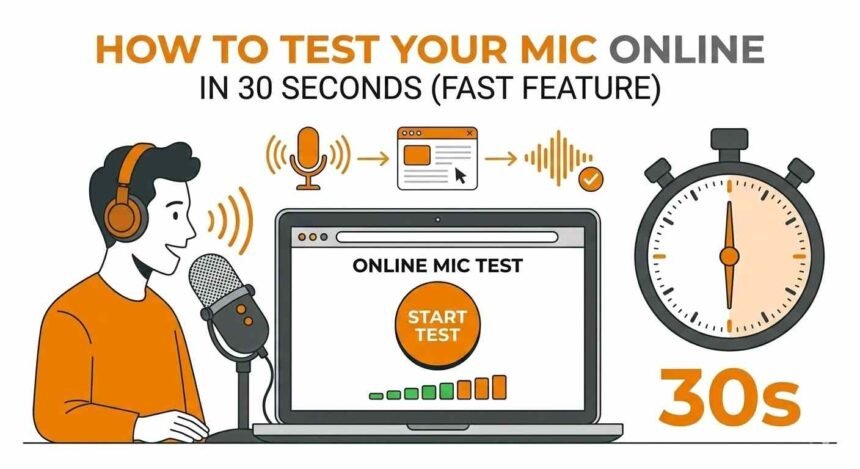
The good news is that you can run a quick mic test online in about 30 seconds. You only need a browser and an internet connection. Most mic test tools instantly detect your device, display sound activity, and show a live waveform so you can confirm your mic is capturing audio.
What Is a Mic Test
A mic test checks whether your device can capture sound and send it correctly through your system or browser.
When you perform a mic test, the tool usually checks three important things:
- Whether the system detects your mic
- Whether the mic captures sound
- Whether the sound level is clear and balanced
Most online mic test tools show sound bars, volume meters, or a waveform so you can see your voice activity in real time.
How to Check if Your Mic Works
Before running an online mic test, it helps to confirm that your mic is connected and recognized by your device.
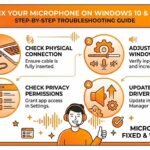
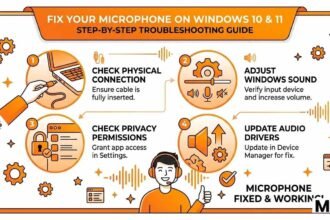
Check Your Mic Connection
First, confirm that your mic is properly connected.
Common mic types include:
- Laptop built in mic
- USB mic
- Headset mic
- Bluetooth headset mic
If you use a USB or headset mic, unplug and reconnect it to ensure your system detects it correctly.
Select the Correct Mic
Sometimes computers have multiple audio devices. If the wrong one is selected, your mic test may show no sound.
Check your system settings and confirm that the correct mic is selected as the input device.
Once selected, speak into your mic and watch the input indicator. If it moves, your mic is working.
Allow Browser Mic Access
Online mic tests require permission to use your device audio.
When the browser asks for access, click Allow. If permission is denied, the mic test will not detect your mic.
Using an Online Mic Test Tool
Online mic test tools are simple and fast. They work directly in your browser and do not require any downloads.
Step 1 Open a Mic Test Website
Search for a mic test tool and open the page. Most tools automatically prepare to test your mic.
Step 2 Allow Access to Your Mic
A small permission message will appear in your browser. Allow the website to use your mic so the test can start.
Step 3 Speak Into Your Mic
After permission is granted, speak normally into your mic.
During the test you should see:
- Moving sound bars
- A waveform reacting to your voice
- A volume meter showing audio levels
If these indicators respond to your voice, the mic test confirms your mic is working.
Step 4 Review the Test Result
If the sound bars or waveform move while you talk, your mic is active.
If nothing moves, there may be a connection or settings issue.
Checking Mic Waveform During a Mic Test
Many online mic test tools show a waveform, which helps visualize your voice.
What the Waveform Shows
A waveform is a visual display of sound activity. When you speak, the mic captures sound waves and the tester displays them as moving lines.
If the waveform moves while you talk, your mic is successfully capturing audio.
If the waveform stays flat, the mic is not receiving sound.
Why Waveforms Are Helpful
Waveforms help you quickly understand whether your mic is picking up sound properly.
They can also show:
- Whether your voice is too quiet
- Whether the mic is capturing background noise
- Whether sound levels are stable
Checking Mic Volume Levels
A mic test also shows the input volume level, which indicates how loud your voice is being captured.
Understanding Volume Indicators
Most mic test tools display sound levels using bars or meters.
Typical volume behavior includes:
- Low bars mean your mic volume is too quiet
- Medium bars show a normal speaking level
- High spikes indicate very loud input
For the best results, the volume should stay in the middle range while speaking normally.
Adjusting Your Mic Volume
If your mic test shows very low sound levels, you can increase the input volume in your system settings.
After adjusting the volume, run the mic test again to check if the levels improve.
Fast 30 Second Mic Test Method
If you only want a quick check, you can complete a mic test in a few simple steps.
- Open a mic test tool in your browser
- Allow access to your mic
- Speak normally into the mic
- Watch the waveform or sound bars
If the indicators move while you speak, your mic is working correctly.
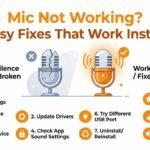
Common Problems During a Mic Test
Sometimes a mic test may show no sound activity. This usually happens because of simple issues.
Common causes include:
- Browser permission blocked
- Wrong mic selected
- Muted mic
- Loose headset or cable
- Audio driver issues
Checking these problems usually fixes most mic test failures.
Tips for a Better Mic Test
For accurate mic test results, follow these simple tips.
Speak at a normal volume and keep a steady distance from your mic. Testing in a quiet environment also helps reduce background noise and gives clearer results.
Refreshing the mic test page or reconnecting your mic can also fix temporary detection problems.
Conclusion
Running a mic test is the easiest way to confirm that your audio is working before calls, meetings, recordings, or games. With an online mic test tool, you can quickly check device detection, sound activity, waveform movement, and volume levels in just 30 seconds.
By doing a quick mic test before using voice features, you can avoid communication problems and ensure your voice is heard clearly every time.