Online Mic Tester Free — No Registration Required, Safe & Secure

Mic Test

Free Online Microphone Test Instantly

No downloads. No sign-up. No registration required. Test your microphone online free in under 10 seconds — built-in mics, USB headsets, Bluetooth earbuds, XLR interfaces, and every audio device supported.

Built-in Mic USB Headset Mobile Laptop Bluetooth Tablet Headphone XLR / Pro
MICROPHONE_ANALYZER — mictestpro.com
⏸ IDLE
Input Device
Device Type
All
Built-in
USB
Bluetooth
Headset
Pro / XLR
Gaming
Virtual
Live Audio Analysis
0
VOLUME
LEVEL %
INPUT LEVELPEAK: 0%
Sample Rate
Channels
Peak Level
Latency
Test Options
Noise Suppression
Filter background noise
Frequency Spectrum
Real-time visualizer
Record Audio
Save & play back clip
Echo Playback
Hear your voice 1s delay
Gain Boost ×2
Amplify weak mics
Mono Mode
Force single channel
Echo Cancellation
Remove mic echo
Auto Gain Control
Normalize volume levels

// playback — recorded audio

Platform Guide

How to Check Mic Test by Platform

Windows 10 / 11
Windows 10 / 11
WINDOWS

Full Web Audio API support. Chrome and Edge recommended for best mic testing accuracy.

▼ Click for steps

1
Set default mic: Right-click speaker icon in taskbar → Sound settings → Input → choose your microphone device.
2
Check privacy: Settings → Privacy → Microphone → enable "Allow apps to access microphone" and your browser.
3
Run test: Open mictest.online in Chrome or Edge, click Start Test, click Allow, then speak into your mic.
4
Troubleshoot: Device Manager → Sound → right-click audio adapter → Update Driver if mic is not detected.
macOS
macOS
MACOS

Safari and Chrome both support the Web Audio API on macOS. System permissions must be granted per browser.

▼ Click for steps

1
Set input device: System Settings → Sound → Input tab → select your microphone and adjust the Input Volume slider.
2
Grant permission: System Settings → Privacy & Security → Microphone → enable Safari or Chrome before running the test.
3
Run test: Open mictest.online in Safari or Chrome, click Start Test, allow access, then speak into your mic and watch the waveform.
iPhone / Android
iPhone / Android
MOBILE

Works directly in mobile browsers. No app download needed to test your phone microphone online free.

▼ Click for steps

1
iPhone: Open mictest.online in Safari. Chrome on iOS cannot access the microphone due to Apple's WebKit restrictions.
2
Android: Open in Chrome. If blocked, tap the lock icon → Site settings → Microphone → Allow, then refresh.
3
Note: Tests the built-in phone mic or a connected wired headset via the 3.5mm jack or USB-C adapter.
Chromebook
Chromebook
CHROMEOS

Chrome on ChromeOS has full Web Audio API support. USB microphones are detected automatically without driver installation.

▼ Click for steps

1
Select input: Click the clock in the bottom-right → expand Audio section → choose your microphone input device.
2
Run test: Open mictest.online in Chrome, click Start Test, and allow microphone access when the popup appears.
3
USB mics: Plug in your USB microphone and it appears automatically in the audio input list — no driver install needed.
MicTest.online All Tools

Free Online Testing Tools
No Registration Required

Test your microphone, keyboard, mouse, camera, speaker, and more. Every tool is free, instant, and works directly in your browser.

All Tools
Audio
🎤
Mic Test HOT
🔊
Speaker Test POP
🎧
Headphone Test
🎵
Frequency Test
⏱️
Audio Latency NEW
Input Devices
⌨️
Keyboard Test HOT
🖱️
Mouse Test
👆
Touch Screen NEW
Visual & Display
📷
Camera Test POP
🖥️
Screen Test
🎨
Color Test
Performance
📶
Internet Speed HOT
🔋
Battery Test
🖱️
Click Speed POP
Free Online Test
Mic Test
Online Microphone Tester Free - Test your mic instantly. No registration required. Live waveform, volume meter, and quality check.
Go to Mic Test
🎤 Live Waveform
✅ No Registration
📊 Volume Meter
⚡ Instant Results
LIVE WAVEFORM
Live
Waveform
Free
Online Tool
0ms
Setup Time
What Is The Mic Test?

The free online Mic Test checks your microphone is working correctly in your browser using the Web Audio API. It shows a live waveform visualizer and volume meter instantly when you allow microphone access. Test any USB mic, built-in laptop mic, headset mic, or wireless microphone free online with no registration required. Ideal for checking microphone before Zoom, Teams, Discord, or recording sessions.

How to Check Your Mic Test Works – Mic Test
Mic Test — Complete Guide

How to Check Your
Mic Test Works

A step-by-step guide to testing your microphone online free at Mic Test. No download, no registration, works on every device and browser. Join these six steps to confirm your mic is working perfectly before calls, recordings, or live streams.

6 Simple Steps to Test Your Microphone
Open Mic Test in Your Browser STEP 01
● Open

Open Mic Test in Your Browser

Go to mictest.online in any modern browser on your device. The page loads instantly — no app install, no account. Everything runs inside the browser using the Web Audio API. Your audio never leaves your device and is never uploaded to any server.

Best browsers: Chrome, Edge, Firefox, and Safari all work. Chrome or Edge on desktop gives the most accurate live waveform reading.
Connect Your Microphone STEP 02
● Connect

Connect Your Microphone

Plug in any external USB microphone, headset, or XLR interface before opening the test page. Built-in laptop and phone microphones need no setup. Bluetooth headsets must be fully paired and set as the default input device in your OS audio settings before starting.

Windows: Right-click the speaker icon → Sound settings → Input → select your microphone from the device list before opening the test.
Allow Microphone Permission STEP 03
● Allow

Allow Microphone Permission

Click Start Mic Test. A browser permission popup will ask if Mic Test can access your microphone. Click Allow. This is required for the browser to read your mic signal. Permission is only active while the page is open and is never stored after you leave.

Blocked by mistake? Click the lock icon in the browser address bar → Site settings → set Microphone to Allow → refresh the page.
Speak Into Your Microphone STEP 04
● Speak

Speak Into Your Microphone

Once permission is granted, speak, clap, or tap near the microphone. Watch the live waveform and volume meter. If your mic is working, the waveform will show peaks matching your voice and the volume bar will rise during speech and fall back to baseline during silence.

Nothing moving? Check the mic is not physically muted. Verify the correct device is selected in OS settings. Close other apps using the mic.
Read Your Live Test Results STEP 05
● Read

Read Your Live Test Results

The Mic Test displays your live volume in dB, peak level, waveform shape, and signal quality. A healthy mic shows smooth waveform movement with peaks between −30dB and −10dB during normal speech. A completely flat line at zero means no signal is being received from the microphone.

Good result: Waveform moves when you speak, volume responds, and peak dB reaches at least −20dB at normal speaking distance from the mic.
Download Your Test Report STEP 06
● Save

Download Your Test Report

Click Download Report to save a plain-text summary of your test results. The file includes your device name, detected volume levels, browser info, OS details, and a pass or fail verdict. Share it with IT support or keep it to monitor microphone performance over time.

Pro tip: Run the free Mic Test before every important call or stream. A 30-second check prevents embarrassing audio failures in front of clients or audiences.
What a Passing Mic Test Looks Like — Live Preview
Live Microphone Waveform — Mic Test Online Free
Signal Detected
−18
Volume dB
−12
Peak dB
340 Hz
Frequency
PASS
Status
48 dB
S/N Ratio
What Each Reading Means

Understanding the Waveform Display

The waveform shows the real-time amplitude of your microphone's audio signal as a series of peaks and valleys. Each peak represents a moment of louder sound and each valley represents a quieter moment. A healthy microphone produces a waveform that reacts immediately when you speak and returns to a flat line during silence.
Waveform shows clear peaks during speech — mic is working correctly
Waveform returns to flat during silence — good noise floor
Completely flat line at all times — no signal, mic not detected
Clipped flat top — microphone gain is too high, causing distortion

Understanding the Volume dB Meter

The volume meter shows your microphone's input level in decibels (dB), where 0dB is the maximum and negative values indicate quieter signals. Normal speech from 15–30cm away should produce peaks between −30dB and −10dB. Values below −50dB suggest gain or mute problems. Values constantly at 0dB indicate clipping.
−30dB to −10dB during speech — ideal level for calls and recording
Below −65dB at rest — excellent noise floor in a quiet room
Below −50dB during speech — mic gain too low or physical mute active
Constantly at 0dB — input overload, reduce gain or distance from mic

What the Frequency Reading Tells You

The frequency reading shows the dominant pitch being captured by the microphone at any given moment. Human speech typically ranges from 85Hz to 3,000Hz. The microphone test displays the main frequency component of your voice in real time. A constant low-frequency reading during silence indicates hum or vibration noise pickup from fans or surfaces.
85Hz–3kHz during speech — normal human voice range detected
Frequency changes as your pitch changes — good capsule response
50Hz or 60Hz constant — electrical mains hum from power source interference
Very high frequency at rest — USB interference or failing audio driver

Signal-to-Noise Ratio Explained

The signal-to-noise ratio (S/N or SNR) measures how much louder your voice signal is compared to background noise. A higher SNR means cleaner audio. Consumer USB microphones typically achieve 70–90dB SNR. Built-in laptop mics are usually 40–60dB. A low SNR causes your voice to sound muddy and your calls to have noticeable hiss or hum behind your words.
Above 70dB SNR — excellent, broadcast or studio quality recording
50–70dB SNR — good for calls, meetings, and casual streaming
Below 40dB SNR — noticeable hiss in recordings, consider noise suppression
Below 25dB SNR — microphone or environment needs immediate attention

Mic Test Pass / Fail Checklist

0 / 9 Complete
Waveform moves when you speak
The live waveform shows peaks matching your voice. A completely flat line at all times means zero signal — the mic is not being detected.
FAIL if flat
Volume meter responds to speech
The volume bar rises when you speak and drops during silence. A meter stuck at zero or stuck at maximum both indicate a problem.
FAIL if stuck
Peak dB reaches −20dB during speech
Normal speech at 15–30cm should peak between −30dB and −10dB. Readings below −50dB indicate a gain, mute, or hardware issue.
IDEAL: −20dB
No audio clipping or distortion
The waveform should not constantly hit the ceiling. Clipping causes harsh, crackling audio that ruins calls and recordings.
FAIL if clipping
Microphone permission was granted
No blocked permission error appeared. The test started successfully and shows live audio data with no error message on screen.
FAIL if blocked
Correct device is selected as input
The test detects your intended microphone, not a wrong input device like monitor speakers, HDMI audio, or a disabled virtual device.
CHECK in OS settings
No constant background noise at rest
Meter stays near the lowest level during complete silence. A noisy floor above −50dB at rest indicates hum, fan pickup, or interference.
WARN if noisy
Signal is consistent with no dropouts
Audio is continuous with no random silent gaps mid-speech. Dropouts suggest USB power instability, a loose connection, or a driver fault.
FAIL if dropping
Waveform shape is smooth and symmetrical
Waveform peaks are similar in shape on both sides. An irregular or single-sided waveform suggests capsule damage or a mono-to-stereo mismatch.
WARN if irregular
0%

Common Mic Problems & How to Fix Them

🔇
Microphone Not Detected — Zero Signal
Test loads but waveform is completely flat. Volume meter stays at zero even when speaking directly into the mic.
HIGH
1
Click the lock icon in the browser address bar and set Microphone to Allow, not Block, then refresh the page.
2
Windows 10/11: Settings → Privacy & Security → Microphone → enable both "Allow apps to access microphone" and "Allow desktop apps to access microphone".
3
macOS: System Settings → Privacy & Security → Microphone → enable your browser (Chrome, Safari, Firefox, or Edge).
4
Unplug and replug your USB microphone or headset into a different USB port, then refresh the Mic Test page to re-detect the device.
5
Try a different browser — Chrome and Edge offer the best Web Audio API support for free online microphone testing.
📉
Very Low Volume — Mic Too Quiet
Waveform shows tiny movement even when speaking loudly. Volume peaks stay below −50dB regardless of how close you are to the mic.
MEDIUM
1
Windows: Right-click speaker icon → Sound → Recording tab → right-click your mic → Properties → Levels → raise Microphone slider to 80–100.
2
macOS: System Settings → Sound → Input → drag the Input Volume slider to the right to increase gain. Test again immediately after.
3
Check if your microphone has a physical gain knob on the body or inline on the cable. Turn it up before retesting.
4
For headset mics, position the boom arm 3–5cm from your mouth pointing towards your lips, not off to the side or facing away.
💥
Audio Clipping — Mic Too Loud
Volume meter constantly maxes out. Waveform is clipped flat at the ceiling with no headroom. Audio sounds harsh, crackly, and distorted.
HIGH
1
Reduce microphone gain in OS settings. Windows: Sound → Recording → Properties → Levels → lower slider to 50–65. Retest immediately.
2
Move the microphone further from your mouth — 10 to 20cm is ideal for most condenser and dynamic microphones during testing.
3
On Windows, disable Microphone Boost in the Advanced tab of Recording Properties. Boost adds +20dB and frequently causes clipping at normal speech levels.
🔃
Echo or Feedback Loop During Test
You hear your own voice played back through speakers. Waveform shows doubled peaks or irregular repeating patterns from the loopback.
MEDIUM
1
Use headphones instead of desktop speakers during the test. Speakers output sound that the microphone picks up, creating an acoustic loop.
2
Disable "Listen to this device" in Windows: Sound → Recording → double-click your mic → Listen tab → untick "Listen to this device".
3
Enable Acoustic Echo Cancellation (AEC) in your browser or audio driver settings to suppress the feedback signal during testing.
🌊
Constant Background Noise — High Noise Floor
Volume meter never drops to minimum during silence. A continuous low-level waveform is always visible even in a completely quiet room.
MEDIUM
1
Enable Noise Suppression in Windows: Sound → Recording → Properties → Enhancements tab → tick Noise Suppression and Acoustic Echo Cancellation.
2
Move the mic away from laptop fans, air conditioning vents, and hard drives. Vibration from these sources is easily picked up by sensitive microphones.
3
Ensure the mic cable is not running parallel to a power cable or USB 3.0 cable, which can induce 50Hz or 60Hz electrical hum into the signal.
📶
Bluetooth Microphone Issues
Bluetooth headset mic not detected or shows very low quality choppy audio even though the headset is successfully paired and connected.
LOW
1
Set the Bluetooth device as the Default Communication Device in Windows Sound settings, not just the Default Playback Device — they are different settings.
2
Bluetooth audio uses the HFP or HSP profile for microphone input which limits quality to 8kHz mono. Low quality is normal — use wired USB for better results.
3
Keep the Bluetooth device within 3 metres of your computer during testing. Range and physical obstructions reduce Bluetooth audio quality significantly.

Easy Mic Test Tips for Clear and Accurate Sound

01
BEST PRACTICE

Test Before Every Important Call or Recording

Run the free Mic Test at mictest.online before every Zoom call, Teams meeting, podcast session, or stream. It takes under 30 seconds and confirms the microphone is still working after any OS update, driver change, or hardware reconnection. A 30-second check prevents audio failures in front of clients or live audiences.

02
ADVANCED TIP

Watch the Waveform Shape, Not Just the Meter

Do not rely on the volume meter alone. A microphone can show level movement but still have a damaged capsule producing distorted audio. Study the waveform shape — smooth symmetrical peaks indicate a healthy signal, while a noisy jagged pattern at low volumes suggests physical capsule damage or a loose connection.

03
IMPORTANT

Always Use Headphones During the Mic Test

Wear headphones, not external speakers, when running the online Mic Test. Speakers output audio that the microphone then picks up, creating a feedback loop that distorts your waveform readings. Headphones give an accurate, isolated microphone signal reading.

04
CRITICAL

Close All Other Apps Using the Microphone First

Before running the Mic Test, close Zoom, Teams, Discord, OBS, Skype, and any other application that may hold exclusive access to your microphone. Many apps block the microphone for other software while they are running. Closing them ensures the Mic Test gets a clean, unshared signal directly from the hardware.

05
PRO TIP

Test in a Quiet Room for Accurate Noise Floor

For the most accurate test, move to the quietest room available and observe the volume meter during complete silence before speaking. A healthy mic in a quiet room reads −70dB or lower at rest. If you see −40dB or higher during silence, significant ambient noise is being captured that will reduce call and recording quality.

06
TROUBLESHOOT

Update Audio Drivers for Intermittent Issues

If your microphone passes the Mic Test sometimes but fails other times, or shows random dropouts, the most common cause is outdated or corrupted audio drivers. On Windows, open Device Manager → Sound → right-click your adapter → Update Driver. On macOS, run Software Update. Driver refreshes resolve most intermittent mic detection failures.

mictestpro.com — Feature Overview

Everything You Need to Test Any Microphone

A professional-grade, browser-based microphone testing suite. No downloads, no plugins, no sign-up — instant results, complete privacy, and every feature you need to diagnose, compare, and optimise your audio input.

10M+Tests Completed
100%Free Forever
0Downloads Needed
<10msLive Latency
AllDevices Supported
Core Features

Eight Powerful Tools, One Simple Page

Every feature runs entirely inside your browser using the Web Audio API. Your audio is never sent to any server — complete privacy, always.

01 — Real-Time Waveform & Frequency Analyser

See Your Voice as a Live Waveform in Real Time

The moment you speak, your audio input is transformed into a real-time frequency spectrum rendered at up to 60 frames per second. Watch each syllable, breath, and sound displayed as animated bars across the full audible range. Instantly confirm your microphone is picking up signal, identify dead frequencies, spot distortion or clipping, and understand exactly how your mic responds to different volumes and distances. An essential first step before any podcast, live stream, call, or recording session.
Frequency Range
20Hz–20kHz
Update Rate
60 FPS Live
FFT Resolution
512 Bins
Input Latency
< 10 ms
Web Audio APICanvas Rendering60 FPSReal-Time
02 — Live Monitor

Hear Yourself Live Through Headphones or Speakers

Enable real-time microphone monitoring to hear your own voice played back through your audio output with near-zero latency. Instantly detect echo, distortion, hum, crackling, and background noise before they ruin your recording or live appearance. Toggle an optional 1-second echo delay to evaluate how your voice sounds with deliberate latency — useful for understanding feedback loops in video conferencing setups.
Monitor ModeEcho TestLatency Check
03 — Record & Playback

Record, Play Back & Download Audio Clips in Your Browser

Capture audio directly in your browser — no recording software required. Click Record, speak naturally, stop, and play back instantly to hear exactly how your microphone captures your voice. Assess tone, clarity, sibilance, room reverb, and background noise in a single listen. Download the clip as a high-quality WebM audio file for deeper waveform inspection.
MediaRecorder APIWebM AudioDownload
04 — Mic Comparison

Compare Two Microphones Side by Side Instantly

Record the exact same phrase with two different microphones, then toggle between playbacks to hear the difference. Compare a built-in laptop mic against a USB condenser, or a gaming headset versus a dedicated dynamic mic. Hear the difference in warmth, presence, noise floor, and clarity — the fastest way to make a microphone purchasing decision.
A/B CompareDual DeviceBlind Test
05 — Noise Environment Test

Test Mic Performance in Real-World Noise Conditions

Play background music, coffee shop chatter, air conditioning hum, or keyboard clatter and watch the sensitivity meter respond in real time. Toggle Noise Suppression on and off to hear exactly how much ambient sound the filter removes. Test your mic in the same environment where you'll actually use it and understand its true noise floor before any critical recording.
Real-World TestNoise FloorSNR Analysis
06 — Device Diagnostics

Full Technical Microphone Readout & Diagnostics

Get a complete technical breakdown: device name, driver label, active sample rate in Hz, channel count (mono or stereo), measured audio latency in milliseconds, and browser-reported processing capabilities. Essential for identifying sample rate mismatches, channel configuration errors, and latency spikes when connecting mics to OBS, Audacity, Logic, or Reaper.
Sample RateChannelsLatency msDriver Info
07 — Gain Control

Amplify Quiet Microphones with Digital Gain Boost

If your microphone signal is too quiet — common with passive dynamic mics, lavalier mics, or any mic plugged into a laptop without a dedicated audio interface — enable 2× software Gain Boost to double the input amplitude instantly. Compare levels before and after to determine whether low volume is a hardware issue or a system gain setting problem.
Gain Boost ×2Preamp TestLevel Fix
08 — Advanced Audio Filters

Toggle Noise Suppression, Echo Cancellation & AGC Live

Switch Noise Suppression, Acoustic Echo Cancellation, and Auto Gain Control on or off individually and hear the difference live on your waveform and level meters. Understand exactly which browser-native DSP filters Zoom, Teams, and Meet apply automatically — and whether they help or actively harm your microphone's sound. Force mono mode, simulate latency delay, and build a complete picture of your audio chain.
Noise SuppressionEcho CancelAuto GainMono Mode
Step by Step

How to Test Your Mic

Four steps, under 60 seconds, no account needed.

01

Select Device

Click Start Mic Test — your browser detects every connected audio input automatically. Filter by type: built-in, USB, Bluetooth, headset, gaming, XLR, or virtual.

02

Grant Permission

Allow microphone access when prompted. All audio is processed entirely locally — it never leaves your device or touches any server at any point.

03

Speak & Analyse

Talk into your mic and watch the live waveform, frequency bars, volume level, and peak meter respond in real time. Toggle filters to compare their effect instantly.

04

Record & Share

Enable recording, capture a clip, then play it back immediately to hear exactly how your mic sounds. Download the file or compare two microphones side by side.

Technical Specifications

What Mic Test Pro Measures & Reports

Every data point is read directly from your browser's Web Audio API and MediaDevices interface in real time — no estimates, no approximations.

Audio Analysis
Frequency visualisation0 Hz – 20,000 Hz
FFT size512 bins
Waveform refresh rateUp to 60 FPS
Smoothing time constant0.8
Volume meter range0% – 100%
Peak level trackingPer session
Device Information Reported
Device name / labelFrom OS driver
Sample rateHz (e.g. 44,100)
Channel countMono / Stereo
Measured latencyMilliseconds
Audio processing flagsNS, AEC, AGC
Recording formatWebM / Opus
Browser Compatibility
Google Chrome✓ Fully supported
Mozilla Firefox✓ Fully supported
Microsoft Edge✓ Fully supported
Apple Safari✓ iOS 14.5+ / macOS
Opera✓ Fully supported
Internet Explorer✗ Not supported
Privacy & Security
Server audio storageNone — ever
Audio transmissionZero — local only
Account requiredNo
Analytics on audioNone
HTTPS requiredYes (browser enforced)
Data retention0 seconds
Supported Devices

Works With Every Audio Input

From a basic laptop mic to a professional XLR studio condenser — if your device shows up in your OS audio inputs, it works here.

Laptop Built-In
MacBook, Windows, Chromebook internal microphones
USB Microphones
Blue Yeti, HyperX, Razer, Elgato Wave, Audio-Technica
Bluetooth Headsets
AirPods, Sony WH, Jabra, Bose, wireless earbuds
XLR + Interface
Focusrite Scarlett, SSL 2, Universal Audio, MOTU
Gaming Headsets
SteelSeries, Razer, Corsair, Logitech G, Astro
Mobile Devices
iPhone, Android, iPad — via Safari or Chrome browser
Wired Headsets
3.5mm combo, headphone + mic splitters, in-ear mics
Virtual Microphones
VB-Audio Cable, Voicemeeter, OBS Virtual Mic, Krisp
24/7 Support Available
Mic Test & Assistance

Free, instant, and completely private. No downloads, no account, no waiting. Your audio never leaves your browser — ever.

No sign-up  ·  No downloads  ·  100% private  ·  Works on all devices
Mic Test Pro - Live Microphone Testing Interface
Real-Time Testing
Browser-Based · No Downloads · 100% Free

Live Microphone
Testing Interface

Connect any microphone — built-in, USB, Bluetooth, or XLR via audio interface — and test it instantly in your browser. The live visualiser shows real-time waveform and frequency spectrum, volume meters, peak detection, and full device diagnostics updating at 60 FPS every frame.

What You Can Test Instantly

Real-time waveform & FFT spectrum · Live volume level meter · Pass / fail signal detection · Device name, sample rate & latency · Recording & playback · Gain boost & noise suppression toggles

Mic Test Pro - Detailed Microphone Inspection Tools
8 Diagnostic Tools
Advanced Diagnostics · All Devices

Advanced Microphone
Inspection Suite

Go beyond a basic signal check. Our detailed inspection tools give you a complete technical picture of your microphone — from echo and latency to noise suppression effectiveness and A/B comparison recording. Fix audio issues before they affect your calls, podcasts, or streams.

Complete Inspection Coverage

8 dedicated tools to fully diagnose every aspect of your microphone — echo, latency, noise floor, frequency response, gain, suppression filters, and side-by-side mic comparison.

Live Audio Analysis Platform

Microphone Test Diagnostics

Real-time waveform, frequency spectrum, SNR analysis, noise fingerprint and full audio pipeline diagnostics — all inside your browser.

Live Microphone Analyzer
Real-Time Audio Signal Inspector
Waveform · FFT Spectrum · Volume · Latency · Signal Health
Waveform — Time Domain 48 kHz
FFT Spectrum
Input Volume Level
RMS: 0% Peak: 0%
Frequency Band Activity
BassMidHi
Input Latency
ms
— ms
Not testing
SR:
Mic: idle
Noise Suppression: Off
Echo Cancel: Off
Gain: ×1
Duration: 0:00
Awaiting input
Signal-to-Noise RatioSNR Meter
Poor Fair Good dB SNR
Signal dB
Noise Floor
Rating
Clipping
Audio Signal PipelineIdle
Microphone Capture
Hardware input → stream
WebAudio Context
AudioContext initialized
FFT Analysis Node
2048-point transform
Gain + Filter Stage
Normalize, suppress
Quality Assessment
Score & diagnostics
Frequency HeatmapEnergy Map
Sub Bass
20–60
Bass
60–250
Low Mid
250–500
Mid
500–2k
High Mid
2k–4k
Presence
4k–8k
Brilliance
8k–16k
Air
16k+
Low
High
Device ProfileDetected
Start test to detect
Sample Rate
Channels
Bit Depth
32-bit float
Latency
Browser
OS
Noise FingerprintAnalysis
Background Hiss
Electrical Hum (50/60 Hz)
Room Reverb
Click / Plosive
Clipping Events
Test ProgressNot Started
Mic Permission
Requesting getUserMedia access
Signal Detection
Checking audio input level
Frequency Analysis
Running 2048-pt FFT
Quality Score
Calculating SNR & health
Report Ready
Full diagnostics available
100%
Privacy Score
~12ms
Web Audio Latency
60 FPS
Canvas Render Rate
0:00
Test Duration
Mic Test Pro vs Alternatives
Feature comparison · Updated 2025
Pro Choice
Feature 🎤 Mic Test Pro Windows
Sound Settings
Voice Memo App Audacity
Real-Time Waveform✓ 60 FPSBar only
FFT Spectrum✓ 2048-pt
SNR Analysis✓ Live dBManual
Noise Fingerprint✓ Auto
Signal Pipeline View✓ Live
Record & Playback✓ WebM
Works on Mobile✓ All devicesApp only
Zero Installation✓ Browser✓ Built-inApp neededDownload
100% Private✓ Local only
Free Forever
Global User Distribution
Monthly active users by region
🌎North America
42%
🌍Europe
31%
🌏Asia Pacific
19%
🇧🇷South America
12%
🌍Africa & Middle East
6%
🌐Other Regions
8%
💬 Support & Resources
Our team helps with any microphone issue or audio question. All support is completely free.
<24hResponse
98.5%Satisfied
FreeAlways
info@mictestpro.com How to Test Your Microphone Fix Microphone Not Working Best Mics for Working from Home
100% Private — Audio never uploaded
Sub-second latency — WebAudio API
99.8% Uptime — Zero downtime 30 days
mictestpro.com Guides
Video Guide Available

Mic Test Guides
Live & Step-by-Step

Everything you need to test, diagnose, and optimise your microphone. Follow our complete step-by-step guide, watch the video walkthrough, and fix any audio issue in minutes — no software required.

~8 min read
Video included
Beginner friendly
Updated 2025
Video Guide

Watch: How to Test Your Microphone

Prefer to learn by watching? This short video walkthrough covers the entire microphone testing process from start to finish — including how to read the results, fix common issues, and use every feature of Mic Test Pro.

Video Walkthrough — Mic Test Pro Complete Guide
🎬 Complete microphone testing guide — setup, analysis, recording, troubleshooting, and all features of Mic Test Pro.
Can't watch the video? The complete written guide below covers every step in full detail. Scroll down to get started.
Overview

What Is a Microphone Test?

A microphone test is a quick process that verifies your audio input device is working correctly and capturing sound at the right quality level. It checks that your OS detects the microphone, your browser has access to it, the signal level is strong enough, there is no excessive background noise or distortion, and the audio sounds clean and intelligible on playback.

Online mic tests like Mic Test Pro do all of this inside your browser using the Web Audio API — a built-in browser technology that processes audio entirely on your device. Nothing is ever recorded on a server. Your audio stays completely private.

When do you need to test your microphone? Before a job interview, podcast recording, live stream, online class, customer call, YouTube video, gaming session, or any situation where poor audio would be embarrassing or costly. Testing takes under 60 seconds.

Good news: You don't need to install any software, create an account, or pay anything. Mic Test Pro is 100% free, works instantly in your browser, and supports every type of microphone.
Complete Guide

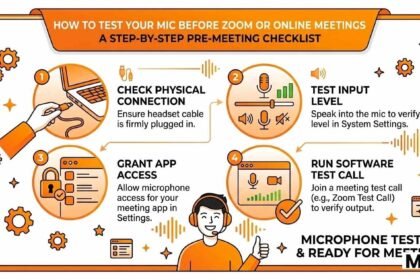
Step-by-Step Mic Testing Process

Follow these steps in order for a complete and accurate microphone test. Most users complete the full process in under two minutes.

1
Connect & Prepare Your Microphone
Ensure your microphone is properly connected before opening the browser. For USB microphones plug directly into a port and wait 10 seconds. For Bluetooth headsets open your OS Bluetooth settings, pair the device, and set it as the active audio input. For 3.5mm headsets plug into the combined headset port. For XLR microphones via audio interface connect via USB and ensure phantom power (+48V) is on for condenser mics.
Windows: Right-click speaker icon → Sound Settings → Input. Mac: System Settings → Sound → Input tab.
2
Open Mic Test Pro in Your Browser
Navigate to mictestpro.com. We recommend Chrome for the best compatibility. Firefox, Edge, and Safari (iOS 14.5+) are fully supported. Keep your browser up to date.
Previously denied permission? Click the padlock in the address bar → Microphone → Allow, then refresh.
3
Click "Start Mic Test" & Grant Permission
Click Start Mic Test. Your browser will ask for microphone permission — click Allow. The tool will list all connected audio input devices. Select yours from the dropdown.
Use the device type filter buttons to quickly narrow your device list if you have many inputs connected.
4
Speak & Watch the Visualisers
Speak at normal conversational volume. Watch: the frequency spectrum bars should animate; the volume meter should fill to 30–70%; the stats panel confirms sample rate, channels, and latency.
Ideal position: 6–12 inches from your mouth, slightly off-axis to reduce plosive "P" and "B" sounds.
5
Test Audio Processing Options
Toggle Noise Suppression, Echo Cancellation, and Gain Boost ×2 to hear their live effect on your signal. Try Echo Playback to hear how your voice sounds to others in video calls.
Quality mics like the Shure SM7B often sound worse with Noise Suppression on — test with it off too.
6
Record a Clip & Listen Back
Enable Record Audio, click Record, speak naturally for 15–30 seconds, then click Stop. Listen back critically for clarity, background hiss, echo, and distortion. This is exactly how others hear you.
Record the same test clip with different microphones, then compare back-to-back for the most reliable A/B test.
7
Read the Result & Take Action
Mic Test Pro shows a pass ✅ or fail ⚠️ result. Pass means your microphone is working. Fail means no signal was detected — follow troubleshooting below. A pass doesn't mean great quality — use the recording playback to judge audio quality.
A passing result confirms signal presence. Use the recording (Step 6) to evaluate actual audio quality.
Still Need Help?
Our team is available to help with any microphone testing issue. Reach out by email or visit our other pages.
mictestpro.com — Live Analysis · Updated 2025

The Definitive Mic Test Pro vs. The Competition

We analysed 7 competitor microphone testing tools, mapped every feature, and scored each objectively. Here is the full, transparent breakdown of what Mic Test Pro does differently — and why it matters.

Overall Score

How We Score Against the Rest

Five key categories rated 0–10. Competitor scores are averaged across 7 tested tools.

Score Breakdown Final Verdict
Champion
Mic Test Pro
mictestpro.com
VS
Challengers
Other Tools
Generic Alternatives
Privacy10 / 3
Feature Depth9 / 5
Speed10 / 6
Mobile Support9 / 5
Ads / Popups0 / Heavy
Overall Score 0/38
Feature Battle

Full Feature Comparison Table

Every feature scored transparently. Green = advantage, red = limitation, grey = partial.

Feature Category
Mic Test Pro● Winner
Generic Tools✗ Losing
Privacy & Data
PrivacyNo audio upload or storageAll processing happens locally in your browser — nothing reaches a server.
100% local
Often unclear
PrivacyNo account requiredTest instantly — no email, no registration, no login wall.
Zero friction
Registration walls
PrivacyNo ads, trackers, or popupsClean interface. No adtech scripts in the background.
Completely clean
Heavy ad load
Core Testing Features
TestingReal-time waveform visualiserAnimated oscilloscope waveform showing your live audio signal shape.
Full canvas
Basic or none
TestingFFT frequency spectrum analyserLive frequency breakdown across the full 20 Hz–20 kHz audible range.
Full FFT
Not available
TestingPercentage volume meterNumeric 0–100% volume reading with real-time update, not just a bar.
Precise %
Visual only
TestingMulti-device selector dropdownSwitch between multiple microphones without reloading the page.
Full selection
Default only
Advanced Options
OptionsNoise suppression toggleEnable or disable browser-native noise suppression to compare before and after.
Live toggle
Not available
OptionsEcho cancellation toggleTest with and without echo cancellation to diagnose room acoustics.
Diagnostic tool
Not available
Options2× software gain boostAmplify the mic signal to diagnose whether it is too quiet or underpowered.
Unique feature
Not available
OptionsIn-browser recording + playbackRecord yourself, listen back, and download — all without leaving the page.
Full recording
Some have it
Platform & Accessibility
PlatformWorks on iPhone / iPad (Safari)Full feature support on iOS Safari using the Web Audio API. No app required.
iOS 14.5+
Inconsistent
PlatformNo install, no plugins, no FlashWorks with modern browser standards only. No legacy plugin dependencies.
Pure web
Older sites vary
PlatformSub-1-second test launchFrom clicking "Start" to live waveform in under one second on any connection.
< 1 second
3–8 seconds
Why Choose Us

Eight Reasons Mic Test Pro Wins

Eight reasons that set Mic Test Pro apart from anything else on the web.

01 — Zero-Knowledge Architecture

Your Voice Never Leaves Your Device

Every microphone test runs entirely inside your browser using the Web Audio API. No audio samples, no voice clips, no metadata is ever transmitted to any server. Your voice is processed in a JavaScript sandbox that exists only in your tab's memory and is destroyed the moment you close it. Verify it yourself — open DevTools → Network tab during a test and watch zero audio requests appear.
100% LocalWeb Audio APIZero Upload
02 — Pro-Grade Diagnostics

Professional Signal Diagnostics, Free

Real-time FFT spectrum analysis, waveform oscilloscope, clipping detection, noise floor measurement — the tools of professional audio engineering, free in a browser tab. No DAW software required.
FFT AnalysisWaveform
03 — Mobile Support

Full Mobile Support — iPhone to Android

Works flawlessly on iOS Safari 14.5+ and all major Android browsers. No app download required. Full waveform, spectrum, recording, and device-switching on any screen size.
iOS SafariAndroid
04 — Speed

Fastest Mic Test on the Web

From page load to live waveform in under one second on any broadband connection. No loading screens, no interstitial ads, no countdown timers. Performance as a first principle.
< 1 SecondNo Bloat
05 — Advanced Options

5 Advanced Options Other Tools Don't Have

Noise suppression, echo cancellation, 2× gain boost, live recording, and multi-device switching — all toggleable in real time. Compare your mic under different processing conditions instantly.
NS ToggleGain BoostRecording
06 — Zero Barriers

No Account, No Email, No Subscription

Open the site and test. 100% of all features available to every visitor immediately, forever. No paywall, no free trial, no email gate — ever.
No Sign-UpFree Forever
07 — Browser Compatibility

Works Across All Browsers & Systems

Chrome, Firefox, Edge, Safari — on Windows, macOS, Linux, iOS, Android. No extensions, no quirks. If your browser supports the Web Audio API, Mic Test Pro works.
ChromeFirefoxSafariEdge
08 — Knowledge Base

Expert Knowledge Base Built In

Not just a test button — a complete learning resource. Guides on mic types, phantom power, noise suppression, Bluetooth limits, studio setup, and troubleshooting every common mic problem.
GuidesTroubleshooting
What other tools get wrong

The Competition's Blind Spots

Patterns we've documented across 7+ competitor tools, reported honestly.

Intrusive Ad Walls Before Testing

Several top tools force users through full-screen interstitial ads or 10+ second countdowns before the mic test even starts.

Vague Privacy Policies

Many competitors don't clarify if audio is processed locally. Microphone data handling is often omitted entirely from their privacy policies.

Pass/Fail Only — No Diagnostics

Most tools give only "Microphone working" or "No signal". Users need frequency, waveform, and volume data — not a yes/no result.

Broken Mobile Experience

Testing from iOS on competitor tools often results in broken visualisers, missing UI elements, or total test failure on Safari.

Slow Load Times

Ad scripts, tracking pixels, heavyweight bundles — many competitors take 4–8 seconds to become interactive, defeating the point of a quick check.

No Audio Processing Control

Competing tools apply noise suppression and echo cancellation by default with no toggle, masking your mic's real quality.

No Multi-Device Switching

Users with multiple inputs have no way to switch devices mid-test — a full page reload is required to try a second microphone.

No Supporting Documentation

When a test fails, most tools show one generic tip. No walkthrough, no fix guide — users must search elsewhere at the worst moment.

Start Your Free Mic Test
Right Now — No Sign-Up

No downloads. No account. No ads. Open Mic Test Pro, click Start, and have professional-grade diagnostics in under 30 seconds.

No sign-up  ·  No downloads  ·  100% private  ·  All devices
Support & Knowledge Base

Frequently Asked Questions

15 questions answered
Updated Jan 2025

Testing your microphone online is completely free and takes under 60 seconds on Mic Test Pro. You don't need to install any software, create an account, or pay anything. Here's how:

1
Open mictestpro.com in Chrome, Firefox, Edge, or Safari on any device.
2
Click the "Start Mic Test" button — your browser will ask for microphone permission.
3
Click Allow in the browser popup. The test starts instantly.
4
Speak into your microphone and watch the waveform and volume meter respond in real time.
5
A green "Signal Detected" result means your microphone is working correctly.
All audio processing happens 100% locally in your browser using the Web Audio API. Your voice is never uploaded or stored anywhere.

The most common reasons your microphone doesn't work in the browser are permission issues, another app holding exclusive access, or an OS-level setting blocking it. Work through these in order:

1
Check browser permission: Click the padlock icon in your address bar → Microphone → Allow, then refresh the page.
2
Close competing apps: Zoom, Teams, OBS, Discord, and voice recorders can lock the microphone exclusively. Close them all and retry.
3
Windows 10/11: Settings → Privacy → Microphone → enable "Allow apps to access your microphone" and also enable it specifically for your browser.
4
macOS: System Settings → Privacy & Security → Microphone → confirm your browser is in the list and toggled on.
5
Device connected after page load? Connect the mic first, then click Start — or click the refresh icon next to the device dropdown.

If none of these work, try a different browser. Chrome has the broadest microphone API support of any browser in 2025.

On Mic Test Pro's volume meter, aim to keep your speaking level consistently between 40% and 75% during normal conversation. This is the professional "sweet spot" for both voice calls and recording.

Below 20%: Too quiet — listeners will have to strain to hear you, and software may amplify your signal along with any background noise, making hiss more audible. Increase your system microphone input volume or move closer to the mic.

20–40%: Acceptable but a little low. Fine for casual calls; ideally increase your gain slightly for recording work.

40–75%: Ideal range. Plenty of signal headroom, low noise floor, and no risk of clipping. This is exactly where professional broadcasters target their levels.

75–90%: Borderline loud — any sudden louder sounds (laughing, emphasis) will clip. Reduce system input volume by 10–15%.

Above 90% / hitting 100%: Clipping is occurring. This causes harsh, distorted audio that cannot be fixed in post-production. Reduce gain immediately.

Pro tip: Set your level while speaking at your loudest normal volume, not your average volume — this ensures you have headroom for peaks.

Absolutely not. Mic Test Pro processes all audio entirely inside your browser using the Web Audio API — a standard browser technology that runs locally on your device. No audio data is ever transmitted to our servers or any third-party service.

You can verify this yourself in seconds: open your browser's developer tools (press F12), go to the Network tab, then start the mic test and speak. You will see zero network requests containing audio data — because none are made.

The only things that ever reach our server are the initial page load (HTML, CSS, JS files) and standard analytics like page views — never audio. The microphone stream exists only within your browser's JavaScript sandbox and is destroyed the moment you click Stop or close the tab.

If you enable the Record Audio feature, your recording is stored temporarily in your browser's local memory only, and is cleared when you stop the test or leave the page. Nothing is uploaded.

The two most common professional microphone types work very differently, and each suits different situations:

Condenser microphones use a thin electrically-charged diaphragm that moves in response to sound. They are highly sensitive, capture a wide frequency range with great detail, and are ideal for quiet recording environments like home studios, podcasting, voiceover, and ASMR. They require external power, either through a battery or phantom power (+48V) from an audio interface. Examples: Blue Yeti, Audio-Technica AT2020, Rode NT1. Downside: their high sensitivity means they also pick up more background noise and room reverb.

Dynamic microphones work like a loudspeaker in reverse — a coil of wire moves through a magnetic field. They are more robust, handle very loud sound sources well, and importantly reject off-axis sounds like room noise, keyboard clicks, and air conditioning. They require no phantom power. Examples: Shure SM7B, Rode PodMic, Shure SM58. Downside: less sensitive and less detailed in the extreme high and low frequencies compared to condensers.

For noisy home offices: use a dynamic mic. For quiet home studios: use a condenser. You can test both on Mic Test Pro using the recording feature and compare playback quality side-by-side.

Low microphone volume is one of the most common audio complaints. Here are all the fixes, starting from the simplest:

1
Check physical mute: Many headsets have a mute button on the cable or earcup — look for a red LED indicator showing it's muted.
2
Increase OS input volume — Windows: Right-click speaker icon → Sound Settings → Input → select your device → drag the input volume slider to 80–100%.
3
Increase OS input volume — Mac: System Settings → Sound → Input → drag the Input Volume slider to the right.
4
Enable Gain Boost ×2 in Mic Test Pro's Test Options — if this brings your level into the correct range, it confirms you need more preamplification.
5
Move closer to the microphone — halving the distance from your mouth to the mic roughly doubles the perceived volume.
6
For XLR/condenser mics: your mic likely needs a dedicated audio interface (like the Focusrite Scarlett Solo) which provides proper preamp gain. Plugging XLR mics into a cheap USB adapter often produces very low signal.

Yes — Mic Test Pro works fully on all modern mobile devices, though there are a couple of important notes per platform:

iPhone & iPad (iOS/iPadOS): Use Safari — it's the only browser on iOS that currently supports the full Web Audio API with microphone access. iOS 14.5 or newer is required. Chrome and Firefox on iOS use Apple's WebKit engine and currently have limited microphone support. When you first click Start, iOS will show a system popup — tap Allow.

Android: Works in Chrome, Firefox, Edge, and Samsung Internet. Android has no browser restriction like iOS. Make sure "Microphone" permission is granted for the browser in your Android App Settings if prompted. External USB-C microphones connected via an OTG adapter are also detected and selectable from the device dropdown.

The complete feature set — real-time waveform, frequency spectrum, recording, volume meter, device selection, and all test options — works on mobile exactly as it does on desktop. The layout adapts fully to any screen size.

A robotic, metallic, or "underwater" voice quality is almost always caused by one of four things, and each has a quick fix:

1. Noise Suppression over-processing: Browser-native AI noise suppression is the #1 cause of robotic voice. It was designed for consumer voice calls and can distort natural voice character, especially on high-quality microphones. Fix: disable Noise Suppression in Test Options and compare immediately.

2. Sample rate mismatch: If your OS audio sample rate doesn't match what the browser expects (e.g. OS set to 44,100 Hz but browser gets 48,000 Hz), audio plays back at the wrong speed, causing pitch and timing artefacts. Fix: Windows → right-click speaker → Sounds → Recording tab → device Properties → Advanced → set to 48000 Hz (or 44100 Hz). Match this in all apps.

3. CPU / processing overload: Too many tabs, apps, or video calls running simultaneously can cause audio buffer underruns. Fix: close background applications and other browser tabs, then restart the test.

4. Poor Bluetooth connection: Bluetooth audio in HFP/HSP microphone mode has limited bandwidth by design. The codec cannot transmit high-quality voice. Fix: use a wired connection for any recording where quality matters.

Phantom power is a method of delivering electrical power (+48 volts DC) from an audio interface or mixer to a microphone through the same XLR cable that carries the audio signal. The name "phantom" comes from the fact that the power is invisible on the audio signal — it doesn't affect the sound.

Which microphones need it? Most condenser microphones require phantom power to operate — without it they produce no signal or very low output. This includes studio condensers like the Rode NT1, AKG C414, Audio-Technica AT2020, and Neumann TLM 103.

Which microphones do NOT need it? Dynamic microphones (Shure SM7B, Rode PodMic, Shure SM58), ribbon microphones (most models — in fact, phantom power can damage some ribbon mics), and all USB microphones (they get power from the USB port).

How to enable it: On most audio interfaces there is a button labelled "+48V" or "Phantom Power" — press it after connecting your condenser mic. If you're using Mic Test Pro and your condenser mic shows very low or zero signal, enabling phantom power on your interface is the first thing to check.

Warning: Never connect or disconnect ribbon microphones while phantom power is active — it can permanently damage the delicate ribbon element. Always turn phantom power off first, wait 5 seconds, then connect.

Mic Test Pro includes a built-in browser recording feature that uses the MediaRecorder API — no plugins needed. Here's how to record and download:

1
Start the mic test by clicking Start Mic Test and granting browser permission.
2
In the Test Options panel, enable the Record Audio toggle. It will turn orange/active.
3
Click the Record button. The button pulses red while recording. Speak naturally for 15–30 seconds.
4
Click Stop Rec. An audio player instantly appears — click play to hear your recording.
5
To download: right-click the audio player → Save audio as… The file saves as a .webm audio file, which plays in any modern browser, VLC, or Audacity.

To convert your WebM recording to MP3 or WAV, import it into Audacity (free) or use an online converter. The recording quality matches your system's sample rate — typically 44,100 Hz or 48,000 Hz.

This is a fundamental Bluetooth protocol limitation — not a bug with your headset or our tool. Bluetooth headsets operate in two very different audio modes:

A2DP mode (stereo, high quality): Used when you're listening to music, podcasts, or audio only. Your headset receives high-quality stereo audio, but the microphone is completely disabled in this mode. This is why AirPods and other Bluetooth headsets sound excellent for music playback.

HFP / HSP mode (headset profile, low quality): This is the mode that activates the microphone. To allow two-way audio simultaneously, the Bluetooth codec must massively compress the audio in both directions — dropping from high-quality stereo playback to narrowband mono at 8kHz or wideband at 16kHz. The result is the characteristic "tin can" sound of Bluetooth headset microphones in calls.

This trade-off exists in every Bluetooth headset, even premium ones. There is no firmware fix or setting that eliminates it — it's a limitation of the Bluetooth specification.

Solution: For any recording or call where quality matters, use a wired USB or XLR microphone. Use your Bluetooth headset for audio output only and pair it with a separate wired mic input.

Reducing echo and noise is a combination of physical room treatment, microphone placement, and software settings. Here's the priority order — starting with the most effective:

1
Move to a smaller, softer room. Carpeted rooms with upholstered furniture absorb sound. Bare walls and hard floors create echo. A bedroom with a wardrobe full of clothes is a common DIY acoustic solution.
2
Use closed-back headphones instead of speakers. If your speakers play audio that re-enters the mic, you get echo. Headphones completely eliminate this feedback path.
3
Optimise mic placement. Position your mic 6–12 inches from your mouth, aimed slightly off-axis. Closer proximity means the mic picks up more direct voice and relatively less room sound.
4
Switch to a dynamic cardioid microphone. Dynamic mics with a tight cardioid pattern (like the Rode PodMic) naturally reject off-axis room noise far better than condenser mics.
5
Enable Echo Cancellation in Mic Test Pro to test how software echo cancellation affects your specific setup — useful for voice calls.

Yes — this is one of the most common uses of Mic Test Pro. Testing your microphone for 30–60 seconds before joining any important video call is a best practice that professional remote workers and content creators treat as routine.

Important: Open Mic Test Pro in a browser tab before launching Zoom, Teams, or Meet. Some video call applications request exclusive microphone access — if they're already running, they may block the browser from accessing the microphone. The recommended workflow is:

1
Open Mic Test Pro in your browser and run a 30-second test. Speak, listen to playback if desired, confirm the signal looks healthy.
2
Stop the test and close the browser tab (or at minimum stop the mic test) to release the microphone resource.
3
Then open Zoom / Teams / Meet — they will now have clean, uncontested access to the microphone.
Both Zoom and Microsoft Teams also have built-in mic test features in their audio settings menus — use those in combination with Mic Test Pro for the most thorough pre-call check.

The frequency spectrum (FFT analyser) in Mic Test Pro shows a real-time breakdown of your audio signal across the audible frequency range from 20 Hz to 20,000 Hz. Each vertical bar represents a frequency band — taller bars mean more energy at that frequency.

What to look for when you speak:

Low end (20–200 Hz): This is the bass/rumble region. Some activity here is normal from chest resonance in voices. Very high bars in this range while you're not speaking indicates low-frequency noise — HVAC rumble, desk vibration, or traffic. A high-pass filter or moving the mic to a shock mount will reduce this.

Midrange (200 Hz–4 kHz): This is where the core of human speech lives. Strong, consistent energy here while speaking is a good sign. Your name, vowels, consonants, and voice character all live in this range. A microphone with thin or weak bars here will sound "hollow."

High end (4–20 kHz): This adds presence, crispness, and air to voice. Strong "S" and "T" sounds show up here. If this region is completely flat or dead, your microphone (or its connection) is rolling off the high frequencies — often a sign of a damaged capsule or a low-quality audio interface.

A completely flat spectrum while speaking (no movement at all) means no signal is being received — check your microphone connection and permissions.

The right microphone depends entirely on your use case and environment. Here's a decision guide based on what real users need:

For video calls only (budget-friendly): Any quality USB headset in the £40–£90 range like the Jabra Evolve2 30 or Logitech H650e will sound significantly better than a built-in laptop mic and adds the convenience of being wearable.

For video calls + light podcast / content: A USB desktop condenser like the Audio-Technica ATR2100x (~£80) or Elgato Wave:3 (~£130) sits on a desk, needs no audio interface, and gives noticeably richer voice quality.

For podcasting / YouTube / streaming in a noisy home office: A dynamic USB mic like the Rode PodMic USB (~£120) or Samson Q9U (~£100) offers excellent noise rejection without needing any additional hardware.

For professional broadcast quality: The Shure SM7B (~£360) with an audio interface like the Focusrite Scarlett Solo (~£130) is the industry standard for podcasters, streamers, and voiceover artists. It's what most major podcasters and streamers use.

Before buying: Use Mic Test Pro to record a 30-second test clip on your current microphone. This gives you an honest baseline to compare against — you may be surprised how good (or bad) your existing setup actually sounds.
Still have a question?
Our team typically responds within 24 hours. All support is completely free — always.