There is nothing more embarrassing than joining an important Zoom call only to hear someone say, “We cannot hear you,” or “Your audio sounds terrible.” The good news is that this is completely preventable. Testing your microphone before any online meeting takes less than five minutes and saves you from awkward technical problems in front of colleagues, clients, or interviewers.
Why You Should Always Test Your Mic Before Online Meetings
Most people only discover their microphone has a problem when they are already live on a call. By that point, it is too late to fix things properly without disrupting the entire meeting.
Here is why testing beforehand matters:
- You avoid embarrassing moments where no one can hear you
- You catch problems like low volume, background noise, or distortion before they affect anyone else
- You come across as professional and prepared
- You give yourself time to fix any issues without pressure
- You reduce meeting anxiety because you know your setup works
Testing your mic takes less time than most people think. Once you make it a habit, it becomes as natural as checking your appearance before a video call.
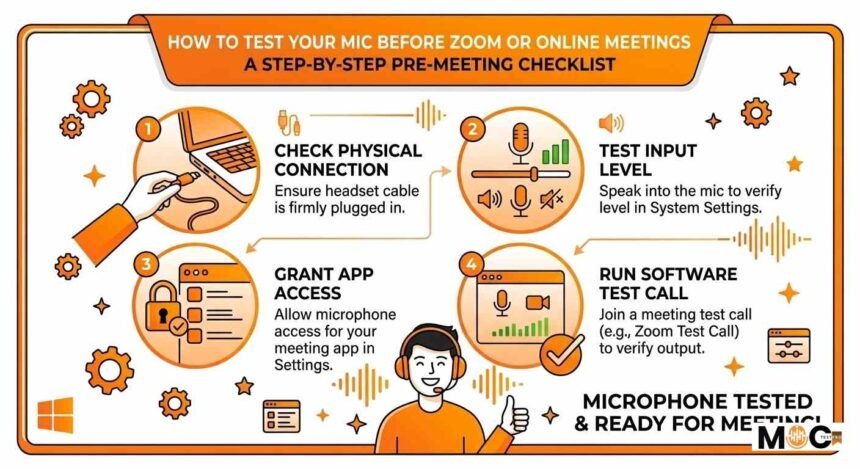
What to Check Before You Even Start Testing
Before you run any mic test, go through this quick checklist. Many audio problems are caused by simple oversights that take seconds to fix.
Check Physical Connections First
If you are using an external microphone, headset, or any wired audio device, start here:
- Make sure the cable is fully plugged in and seated properly in the port
- Check that the USB connector is not loose or only partially inserted
- If your mic has a physical mute button, make sure it is not activated
- Check for any indicator lights on your mic that show whether it is active or muted
- Try unplugging and replugging the device if you are not sure it is connected correctly
Check That Your Computer recognizes Your Device.
Your computer needs to detect your microphone before any app can use it:
- On Windows, right-click the speaker icon in the bottom right corner of the taskbar and select Sound Settings or Open Sound Settings
- On Mac, go to the Apple menu, then System Settings, then Sound, and click the Input tab
- Look for your microphone in the list of input devices
- If it does not appear, try plugging it into a different USB port or restarting your computer
Make sure no other app is using the mic.
Only one application can use your microphone at a time on most systems. If another app, such as a previous Zoom session, a recording tool, or a browser tab, is already using your mic, your meeting app may not be able to access it. Close any other apps that might be capturing audio before you test.
How to Test Your Mic on Windows
Windows has a built-in microphone test tool that works without downloading any extra software. Here is how to use it step by step.
Method 1: Using Windows Sound Settings
This is the quickest way to test your mic directly inside Windows:
- Click the Start menu and open Settings
- Go to System and then click Sound
- Scroll down to the Input section
- You will see your microphone listed there
- Speak into your mic and watch the blue bar next to the microphone name
- If the bar moves when you speak, your mic is working and picking up sound
- If the bar does not move at all, your mic is either muted, not connected properly, or not selected as the default device
Method 2: Using the Windows Voice Recorder App
This method lets you actually hear how you sound, which is more useful than just seeing a moving bar:
- Open the Start menu and search for Voice Recorder
- Click the red record button and speak normally for about 20 to 30 seconds
- Say something like “this is a test, checking one two three, can anyone hear me clearly?”
- Stop the recording and play it back through your headphones or speakers
- Listen for clarity, background noise, echo, or any distortion
- If it sounds clear and natural, you are good to go
- If it sounds muffled, too quiet, or noisy, you need to adjust your settings before your call
Method 3: Adjusting Microphone Volume in Windows
If your recording sounded too quiet or too loud, here is how to fix it:
- Right-click the speaker icon in the taskbar
- Select Sound Settings and then go to Input
- Click on your microphone device
- You will see a volume slider. Try setting it between 70 and 90 percent as a starting point
- Re-record yourself and listen again until the volume sounds natural and clear
How to Test Your Mic on Mac
Mac makes it very straightforward to test and adjust your microphone without any extra software.
Method 1: Using System Settings Sound Input
- Click the Apple logo in the top left corner of your screen
- Go to System Settings and then click Sound
- Click on the Input tab at the top
- Select your microphone from the list
- Speak into the mic and watch the Input Level bar at the bottom of the window
- If the bar responds to your voice by moving, your microphone is working correctly
- Adjust the Input Volume slider to set the right level — aim for the bar reaching roughly halfway to two-thirds when you speak at a normal volume.
Method 2: Using QuickTime Player to Record a Test
QuickTime Player is already installed on every Mac and works perfectly for mic testing:
- Open QuickTime Player from your Applications folder
- Click File in the menu bar and select New Audio Recording.
- A recording window will appear with a red record button.
- Before pressing record, look at the volume meter next to the record button. It should move when you speak.
- Press the red button to record, speak normally for 20 to 30 seconds, then stop.
- Play back the recording with headphones and listen carefully to how you sound.
- Delete the test file after you are done checking.
How to Test Your Mic Inside Zoom
Zoom has a built-in microphone test feature that simulates exactly what other participants will hear on a call. This is one of the most accurate ways to check your audio before a meeting.
Using the Zoom Audio Settings Test
Follow these steps to test your mic inside Zoom before joining any call:
- Open the Zoom desktop app on your computer
- Click your profile picture or initials in the top right corner
- Select Settings from the dropdown menu
- Click on Audio in the left sidebar
- Under the Microphone section, you will see a dropdown menu to select your mic
- Click the Test Mic button
- Zoom will start recording your voice — speak normally for a few seconds
- Zoom will then play back your recording so you can hear exactly what you sound like
- If it sounds clear and at a good volume, you are ready
- If it sounds bad, adjust the Input Volume slider in the same settings window and test again
Understanding Zoom Audio Settings
While you are in the Zoom Audio Settings, there are a few other things worth checking:
- Suppress Background Noise is a setting that filters out keyboard clicks, fan noise, and ambient sounds. Set this to Auto or High if you are in a noisy environment
- Echo Cancellation helps prevent your voice from echoing back to other participants. Leave this enabled
- Original Sound is a toggle that bypasses Zoom audio processing. Keep this off unless you are a musician or audio professional who wants unprocessed sound
- Automatically Adjust Microphone Volume lets Zoom control your input level. This is fine for casual meetings, but turn it off if you prefer manual control.
Testing Your Mic When Joining a Meeting
Every time you join a Zoom meeting, a small window appears asking you to join audio. Before clicking anything:
- Look for the Test Speaker and Microphone option in that window
- Click it and follow the prompts to do a quick audio check right then and there
- This takes about 30 seconds and confirms everything is working before you enter the meeting
How to Test Your Mic in Google Meet
Google Meet has a simpler audio check than Zoom, but it is still useful.
Before Joining a Google Meet Call
- Open the meeting link in your browser
- Before clicking Join Now, you will see a preview screen showing your camera and audio
- Speak into your mic and watch the microphone icon at the bottom of the preview
- If it pulses or shows movement when you speak, your mic is being detected
- Click the three dots or settings gear icon to open audio settings
- Select your preferred microphone from the dropdown list
- Speak again and confirm the input meter is responding
Checking Mic Settings Inside Google Meet
Once you are in a meeting, you can still check and change your mic:
- Click the three vertical dots at the bottom of the meeting screen
- Select Settings
- Go to the Audio tab
- You will see your selected microphone and a test button
- Use the test to confirm everything is still working correctly
How to Test Your Mic in Microsoft Teams
Microsoft Teams has its own audio testing option that works well for checking your setup.
Using the Teams Device Settings Test
- Open Microsoft Teams on your computer
- Click the three dots next to your profile picture in the top right
- Select Settings from the menu
- Click on Devices in the left sidebar
- Under Audio Devices, select your microphone from the dropdown
- Click Make a Test Call
- Teams will walk you through a brief automated test call
- It records a short message from you and plays it back so you can hear exactly how you sound
- After the test call ends, Teams gives you a summary of your audio quality results
Online Microphone Test Tools You Can Use Right Now
If you want to test your mic without opening any specific meeting app, several free websites let you do a quick check directly in your browser.
Using Online Mic Test Websites
Websites like onlinemictest.com let you test your microphone instantly in your browser without downloading anything:
- Open the website in Google Chrome or Firefox
- Click Allow when the browser asks for microphone permission
- Speak into your mic and watch the visual sound meter on the screen
- If the meter responds to your voice, your mic is working
- These tools only check if your mic is active; they do not play back your audio, so you still cannot hear how you actually sound.
Using a Voice Message App for Playback Testing
One of the simplest ways to hear how you sound is to send yourself a voice message:
- Open WhatsApp, Telegram, or any voice messaging app on your phone
- Record a short voice message and play it back
- This gives you a real-world representation of your mic quality
- Even better, send it to a trusted friend and ask them how it sounds to them
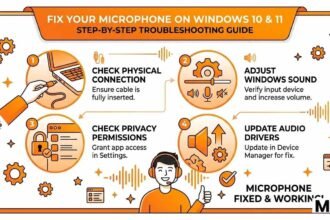
How to Fix Common Microphone Problems Before a Meeting
Finding a problem during your test is actually a good thing; it means you caught it in time. Here are the most common issues and exactly how to fix them.
Problem: No One Can Hear You at All
This is the most common mic issue, and it usually has a simple cause:
- Check that the correct microphone is selected in your meeting app settings
- Make sure your mic is not physically muted using a button on the device
- Check that your operating system has not muted the microphone in sound settings
- Make sure the app has permission to access your microphone in your system’s privacy settings
- Try unplugging and reconnecting the mic, then restarting the app
Problem: Your Voice Sounds Too Quiet
If people can hear you but have to strain to understand, try these fixes:
- Increase the input volume in your operating system’s sound settings.
- Move your mouth closer to the microphone; even 10 centimeters makes a big difference.
- Disable Automatically Adjust Microphone Volume in Zoom and set the level manually.
- Check that nothing is physically blocking the microphone opening.
Problem: There Is Too Much Background Noise
If your test recording sounds noisy and distracting, here is what to do:
- Enable background noise suppression in your meeting app settings
- Close windows and doors to block outside sound
- Turn off fans or air conditioners temporarily if possible
- Use a free app like Krisp to filter out background noise in real time
- Move to a quieter room or area if the noise is unavoidable
Problem: Your Voice Sounds Echoey or Hollow
Echo on a call usually comes from one of two sources. Either the room is causing sound reflections, or your speakers are feeding back into your microphone:
- Use headphones instead of laptop speakers to eliminate feedback echo immediately
- Record in a room with soft furniture, carpet, and curtains to reduce room reflections
- Hang a blanket or thick towel on the wall behind you to absorb sound
Problem: Your Voice Sounds Robotic or Distorted
Distortion usually means the input level is set too high:
- Lower the microphone input volume in your sound settings
- Move your mouth slightly further from the mic
- Speak at a slightly lower volume and test again
Simple Habits to Make Mic Testing Part of Your Routine
The best way to never have an audio problem again is to build a short pre-meeting routine. Here is a simple habit that takes less than three minutes:
- Five minutes before any important call, open your meeting app settings.
- Confirm the correct microphone is selected.
- Run a quick test recording or use the built-in test feature.
- Play it back and listen with headphones.
- Fix any issues if needed, then join the call with confidence.
After doing this a few times, it becomes automatic. You will never join a call unprepared again.