Have you ever been on a call and someone said, “Sorry, can you repeat that?” even though you were speaking clearly? Or have you listened to a recording of yourself and cringed at echoes, hisses, or muffled audio? Poor mic quality is a common problem, but it is also one of the easiest to fix.
Whether you are working from home, streaming, podcasting, gaming, or recording videos, your voice is central to communication. The good news is that you don’t need expensive equipment or a professional studio to improve your mic sound. Most problems come down to a few simple factors: where your mic is placed, the room environment, and your settings.
Why Mic Sound Quality Matters
First Impressions Are Made Through Your Voice
Your voice plays a major role in how people perceive you. Poor audio quality strains listeners’ ability to understand you, leading them to disengage without realizing why. Clear mic sound, on the other hand, conveys confidence, professionalism, and credibility.
Whether in calls, podcasts, or recordings, improving your mic quality is one of the most impactful upgrades you can make for communication.
Common Problems That Hurt Mic Quality
- Background Noise: Fans, traffic, keyboard clicks, or air conditioning can bleed into your mic, making your voice hard to hear.
- Echo and Reverb: Hard walls bounce your voice back into the mic, creating a hollow or tunnel-like sound.
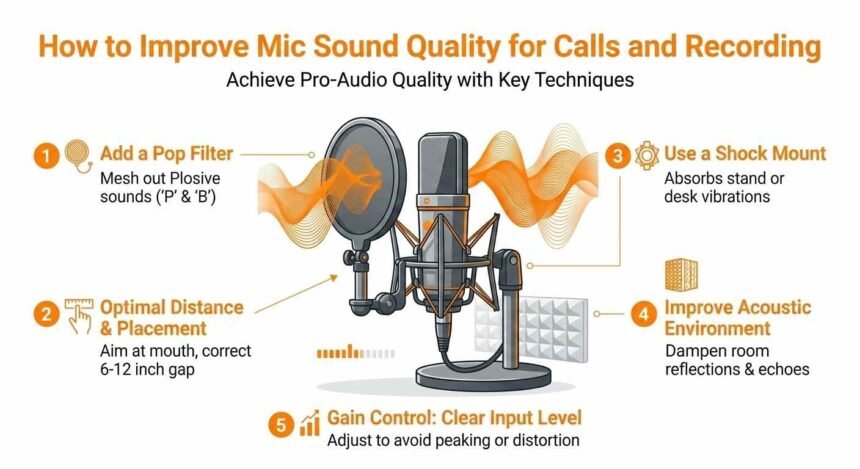
- Plosive Sounds: Sharp pops from letters like P and B occur when bursts of air hit your mic directly.
- Volume Issues: Speaking too quietly or too loudly can cause distortion or make your voice get lost in background noise.
Tip: Most mic problems are caused by your environment or settings, not the mic itself.
Choosing the Right Mic
Not all mics are designed for the same purpose. Choosing the right mic for your situation is key.
Types of Mics
- Built-in Laptop Mic: Good for casual calls, but picks up room noise and sounds thin.
- Wired Headset Mic: Affordable and stays close to your mouth for clear audio during calls or gaming.
- USB Condenser Mic: Ideal for podcasts, streaming, and recording. Offers excellent clarity but picks up room noise easily.
- Dynamic USB Mic: Works well in noisy rooms and live use. Naturally rejects background noise.
- XLR Mic with Audio Interface: Professional-level audio with maximum control. Requires extra equipment but delivers the best quality.
USB vs XLR
- USB Mic: Perfect for beginners, video calls, and casual recordings. Plugs directly into your computer.
- XLR Mic: Best for serious recordings like music, podcasts, or professional voiceovers. Offers better control over audio quality.
Recommended Budget Ranges
- Under $30: Basic USB headset mic for clear calls.
- $50 to $100: Entry-level USB condenser mics for clear recordings.
- $100 to $200: Professional-quality mics used by podcasters and streamers.
- $200+: Broadcast-level audio for professional recording.
Important: A cheaper dynamic mic in a quiet room can sound better than an expensive condenser mic in a noisy environment.
Mic Placement and Position
Where you place your mic is just as important as which mic you use. Small adjustments can make a huge difference.
Golden Distance Rule
For most mics, the ideal distance from your mouth is 6 to 12 inches (15 to 30 cm). Too close causes distortion, too far captures more room noise.
- Headset mics should sit about 1 inch from the corner of your mouth, not directly in front of it.
Angle the Mic Off-Axis
Tilt the mic slightly to the side of your mouth instead of pointing directly at your lips. This reduces plosive sounds, making speech clearer.
Pro Tip: Say “Peter Piper” into your mic. Loud thuds on P sounds mean you need to tilt your mic slightly.
Use a Mic Stand or Boom Arm
- A desk stand prevents vibrations from hands or desk tapping.
- A boom arm lets you position your mic perfectly and keeps it stable during long sessions.
Shock Mounts
A shock mount isolates your mic from desk vibrations, typing, or accidental bumps, keeping your sound clean.
Laptop Mic Tips
If you only have a built-in mic:
- Sit 18 to 24 inches from your laptop.
- Never cover the mic grille.
- Elevate your laptop to bring the mic closer to your mouth level.
Room Acoustics and Environment
Your room can have the biggest impact on mic sound quality.
Why Hard Rooms Sound Bad
Hard surfaces like walls, glass, or tile bounce sound back into your mic, creating echo or reverb.
Soft Materials Absorb Sound
- Curtains, carpets, sofas, cushions, or bookshelves reduce echo.
- Closets with clothes work surprisingly well as DIY studios.
Quick Test
Clap your hands sharply. If you hear a long echo, your room needs treatment.
Acoustic Panels and Foam
- Panels behind and to the side of your mic improve clarity.
- A set of 12 foam panels costs $20 to $40 and makes a noticeable difference.
Controlling Background Noise
- Turn off fans, air conditioners, and appliances if possible.
- Close windows and doors to block traffic.
- Ask others in your home to avoid noise during recording.
Hardware and Connection Settings
Even the best mic can sound bad if connected improperly or set up poorly.
Direct USB Connection
Always plug your USB mic directly into the computer, not through a hub, to avoid static or dropouts.
Mic Gain Knob
- Adjust the gain to control mic sensitivity.
- Too high = distortion. Too low = quiet sound.
- Start around one-third and adjust based on test recordings.
Pop Filter or Foam Windscreen
- Pop filters reduce sharp P and B sounds.
- Foam windscreens block light wind or breath noise.
Audio Interface for XLR Mics
- Turn on phantom power for condenser mics.
- Set the gain so the levels peak green and occasionally touch yellow.
- Sample rate: 44,100 Hz | Bit depth: 24-bit
Software Settings on Your Computer
Windows
- Right-click the speaker icon, then select Sound Settings.
- Select your external mic as the default input.
- Input volume: 80–90%. Avoid 100%.
- Turn off Windows enhancements, such as noise suppression, to achieve natural sound.
macOS
- System Settings → Sound → Input.
- Select the external mic and adjust the input volume to 60–70%.
- Avoid automatic gain control unless needed.
App-Level Settings
- Zoom: Disable auto-volume, use Original Sound.
- Google Meet: Select the correct mic and check input levels.
- Teams, Discord, Skype: Set input manually, turn off auto-adjustments.
Tip: Auto-volume adjustment often creates an unpleasant pumping sound.
Noise Reduction and Audio Filters
Real-Time Noise Suppression
- NVIDIA RTX Voice / Broadcast: AI removes background noise.
- Krisp: Creates a virtual mic with noise cancellation.
- Zoom Noise Suppression: High setting blocks constant background sounds.
Noise Gates
Mute your mic automatically when you are silent, reducing background noise.
High-Pass Filter
Removes low-frequency rumble from traffic or desk vibrations without affecting your voice.
Compression
Reduces volume differences, making your voice consistently audible.
Equalization (EQ)
- Cut 80 Hz below: Remove rumble.
- Reduce 300–400 Hz: Remove boxy tones.
- Boost 3,000–5,000 Hz: Add clarity and presence.
Tools: Audacity (free), OBS, Krisp, RTX Voice
Quick Setup Checklist Before Every Call
- Environment: Soft room, doors/windows closed, noise sources off.
- Hardware: Direct mic connection, correct gain, 6–12 inches from mouth, off-axis, pop filter or shock mount.
- Software: Correct mic selected, input 80–90%, auto-volume off, noise suppression on if needed.
- Test: Record 30 seconds and listen for echo, distortion, or background noise.
Final Conclusion
Improving your mic sound quality does not require expensive gear. The biggest gains come from simple changes:
- Move to a softer room
- Adjust mic placement
- Set proper input levels
- Turn off auto-processing
A $50–$100 USB dynamic mic, pop filter, and desk stand, combined with free tools like Audacity or Krisp, can give you professional-level audio.
Start with one improvement today and build gradually. Within weeks, your calls, recordings, and streams will sound polished, clear, and professional, something you will no longer need to apologize for.
Clear audio shows respect for your audience and makes your message easy to understand. In a world of virtual communication, that matters more than ever.