You are on a Zoom call, and everyone keeps saying, “Can you speak up?” or “We can barely hear you.” You are already speaking at a normal volume, but your voice just isn’t coming through clearly. This is one of the most frustrating audio problems people face, affecting beginners and experienced users alike.
The good news is that low mic volume almost always has a simple fix. In most cases, you do not need to buy new equipment or call a technician. You just need to know where to look and what to adjust.
What Causes Low Mic Volume in the First Place
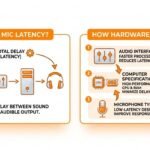
Before jumping into fixes, it helps to understand why this problem happens. Your microphone volume is controlled at multiple levels simultaneously. Your operating system has its own volume settings. Your meeting app has separate settings on top of that. Your microphone hardware may have its own physical controls. And your internet connection can even affect how your voice sounds to others.
When your mic sounds too quiet, the problem could be sitting at any one of these levels, or sometimes at more than one at the same time. This is why people often try one fix, think it did not work, and give up. The real solution is checking each level one by one until you find where the problem is.
Here are the most common reasons your mic is too quiet:
- The microphone input volume is set too low in your operating system settings
- The wrong microphone is selected as the default device
- Your meeting app has its own separate volume setting that is turned down
- The automatic volume adjustment feature is fighting against your manual settings
- Your microphone is physically too far from your mouth
- A physical mute button or switch on your device is partially engaged
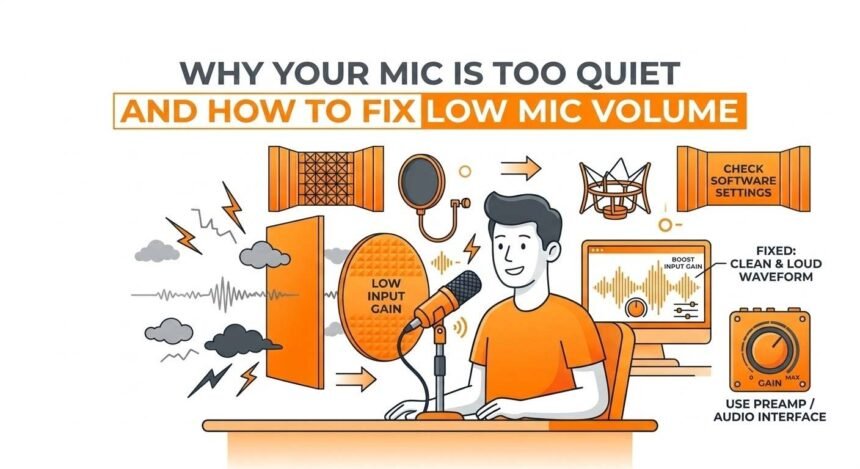
- The microphone gain setting is too low
- Outdated or corrupted audio drivers are limiting performance
- Background noise suppression is filtering out parts of your voice
- Your microphone needs to be closer to your mouth
Each of these causes has a specific solution, and this guide covers them all.
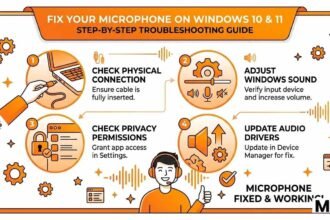
How to Fix Low Mic Volume on Windows
Windows controls microphone volume in its sound settings, and the controls are spread across several menus. Here is how to find and fix each one.
Step 1: Open Windows Sound Settings
The first place to check is the main sound settings panel:
- Right-click the speaker icon in the bottom right corner of your taskbar
- Select Open Sound Settings or Sound Settings from the menu
- Scroll down to the Input section
- You will see your microphone listed there, along with a volume bar
- Speak into your mic and watch whether the bar moves when you talk
- If the bar barely moves or does not move at all, your input level is the problem
Step 2: Increase the Microphone Input Volume
Once you are in the input settings:
- Click on your microphone device to open its detailed settings
- Look for the Input Volume slider
- Drag it to the right to increase the volume
- A good starting point is 80 to 90 percent
- Speak into your mic again and watch the level bar respond
- Aim for the bar to reach roughly 60 to 70 percent of its maximum when you speak at a normal conversational volume
- If it is peaking all the way to the right and going red, you have set it too high and need to pull it back
Step 3: Check the Microphone Properties for Advanced Settings
Windows also has a deeper settings panel that many people never find:
- Go to Control Panel and then open Sound
- Click on the Recording tab at the top
- You will see a list of all audio input devices connected to your computer
- Right-click your microphone and select Properties
- Click on the Levels tab
- You will see two sliders here: Microphone and Microphone Boost
- The Microphone slider controls the base input volume. Set this to 100
- The Microphone Boost slider adds extra amplification on top of that. Try setting this to plus 10 or plus 20 decibels
- Click Apply and then OK
- Test your mic again to hear the difference
What Is Microphone Boost and Should You Use It
Microphone Boost is a Windows feature that electronically amplifies your microphone signal beyond its normal range. It is useful when your voice is still too quiet even after setting the base volume to 100 percent.
The trade-off is that Boost can also amplify background noise along with your voice. Use it in small increments. Start at plus 10 decibels and only go higher if you still need more volume. If you start hearing a lot of hiss or noise in your recordings after enabling Boost, that is a sign you have pushed it too far.
Step 4: Set Your Microphone as the Default Device
Sometimes Windows is using the wrong microphone without you realizing it:
- Go to Control Panel, then Sound, then the Recording tab
- Look at the list of microphones and audio input devices
- The correct microphone should have a green check mark showing it is the default device
- If the wrong device is set as the default, right-click your preferred microphone
- Select Set as Default Device
- Also, select Set as Default Communication Device from the same right-click menu
- Click Apply and OK
This is one of the most common causes of low or missing audio and one of the easiest fixes.
Step 5: Update or Reinstall Your Audio Drivers
Outdated, corrupted, or incomplete audio drivers can severely limit your microphone’s performance. Updating them often resolves volume and quality issues that seem impossible to fix otherwise:
- Right-click the Start menu and select Device Manager.
- Expand the Audio Inputs and Outputs section by clicking the arrow.
- Right-click your microphone device in the list.
- Select Update Driver
- Choose Search Automatically for Drivers and let Windows find the latest version.
- If Windows says you already have the best driver, go to your laptop or microphone manufacturer’s website and download the latest audio driver from there directly.
- Install the driver and restart your computer.
- Test your microphone again after the restart.
How to Fix Low Mic Volume on Mac
Mac handles microphone settings differently from Windows. Here is where to find everything you need.
Step 1: Check the Input Volume in System Settings
- Click the Apple logo in the top left corner of your screen.
- Open System Settings and click on Sound
- Select the Input tab at the top of the Sound window.
- Click on your microphone in the list to select it.
- Look at the Input Volume slider at the bottom of the window.
- Drag it to the right to increase the sensitivity.
- Speak and watch the Input Level bar; it should move noticeably when you talk at a normal volume.
- Aim for the bar to reach about halfway to two-thirds when speaking at your normal conversational level
Step 2: Disable Ambient Noise Reduction
Mac has a feature called Ambient Noise Reduction that filters out background noise. However, it can sometimes be too aggressive and end up making your voice sound quieter than it should:
- Open System Settings and go to Sound
- Click on the Input tab.
- Look for a checkbox or toggle labeled “Use Ambient Noise Reduction.”
- If it is turned on, try turning it off.
- Test your mic and listen to whether your voice sounds louder and clearer.
Step 3: Check App Permissions for Microphone Access
Mac requires you to give each app explicit permission to use your microphone. If an app does not have permission, it cannot access your mic at all:
- Open System Settings and go to Privacy and Security
- Click on Microphone in the list on the left.
- You will see a list of all apps that have requested microphone access.
- Make sure the toggle next to your meeting app is switched on.
- If the app you are trying to use isn’t listed, open the app and try using the mic. Mac will prompt you to grant permission at that point.
Step 4: Reset the Core Audio Process
Sometimes the audio system on a Mac gets stuck in a buggy state, causing volume and quality issues. Resetting it takes only a few seconds:
- Open the Terminal app from the Applications> Utilities folder.
- Type the following command exactly as written: sudo killall coreaudiod
- Press Enter and type your Mac password when prompted.
- The audio system will restart automatically within a few seconds.
- Test your microphone after the reset.
This fix sounds technical, but it is completely safe and often solves mysterious audio problems that nothing else can.
How to Fix Low Mic Volume in Zoom
Zoom has its own microphone settings that work independently from your operating system settings. Even if your Windows or Mac volume is set correctly, Zoom might still be limiting your audio.
Step 1: Open Zoom Audio Settings
- Open the Zoom desktop app.
- Click your profile picture in the top right corner.
- Select Settings from the dropdown menu.
- Click Audio in the left sidebar.
Step 2: Disable Automatically Adjust Microphone Volume
This setting is turned on by default in Zoom, and it is one of the most common causes of low or inconsistent mic volume:
- On the Audio settingOnpage, look for the checkbox labeledthehe”Automatlabeleds””t Microphone Volume.”
- Uncheck this box” “to disable it.
- Now you will see a manual volume slider appear for your microphone.
- Drag this slider to the right to increase the input level.
- Click Test Mic and speak for a few seconds.
- Zoom will play back your recording so you can hear exactly how you sound.
- Adjust the slider until your voice sounds loud, clear, and natural.
Why Automatic Volume Adjustment Causes Problems
Zoom’s automatic volume adjustment keeps your audio at a consistent level. The problem is that it sometimes overcorrects. If there is any background noise in your room, the automatic system can interpret it as your voice being too loud and lower your volume. Then, when you actually speak, your voice comes through much quieter than it should.
Turning this off and setting the level manually gives you much more reliable and consistent results.
Step 3: Check Noise Suppression Settings
Zoom’s noise suppression feature can sometimes filter out parts of your voice, especially if you speak softly:
- In the Audio settings, look for the Suppress Background Noise option.
- If it is set to High, try changing it to Low or Auto.
- High suppression is very aggressive and can make soft voices sound thin and muffled.
- Auto lets Zoom decide how much filtering to apply based on your environment.
Step 4: Check the Original Sound Setting
Zoom has a setting called Original Sound that, when turned on, bypasses all of Zoom’s audio processing and sends your raw mic signal directly to other participants:
- In Audio settings, look for the Show In-Meeting Option and select Enable Original Sound.
- Turn this on
- In a meeting, you will see an Original Sound button in the top-left corner of the Zoom window.
- Turn Original Sound on during the meeting and ask someone to tell you whether your voice sounds louder and clearer.
- Some people find this helps significantly, while others prefer the processed sound
How to Fix Low Mic Volume in Google Meet
Google Meet has fewer built-in audio controls than Zoom, but there are still important things to check.
Checking Mic Settings in Google Meet
- Open a Google Meet call or the preview screen before joining.
- Click the three vertical dots at the bottom of the screen.
- Select Settings and then click Audio.
- Make sure the correct microphone is selected from the dropdown list.
- Speak and watch the microphone level indicator.
- If the level indicator barely moves, the volume is too low.
- Go back to your operating system’s sound settings and increase the input volume there, since Google Meet primarily relies on system-level settings.
Using Chrome Browser Microphone Settings
Since most people use Google Meet through the Chrome browser, Chrome’s own settings also play a role:
- Click the three dots in the top right corner of Chrome.
- Go to Settings and then click Privacy and Security.
- Select Site Settings and then Microphone.
- Make sure meet.google.com is listed as an allowed site.
- If it shows as blocked, click on it and change the permission to Allow
How to Fix Low Mic Volume in Microsoft Teams
Teams gives you good control over your audio settings and even offers a test call feature to check your volume before real meetings.
Adjusting Mic Volume in Teams Settings
- Click the three dots next to your profile picture at the top of Teams.
- Select Settings and then click Devices.
- Under Audio Devices, select your microphone from the dropdown menu.
- Look at the Microphone section and check whether a volume slider is available.
- Adjust the slider upward if your volume is low.
- Click Make a Test Call to hear a recording of your voice.
- Teams will record a short message and play it back so you can judge your volume level.
Checking Teams Noise Suppression
Like Zoom, Teams has noise suppression that can interfere with your voice level:
- In the Devices settings page, look for Noise Suppression.
- If it is set to High, try lowering it to Auto or Low.
- Test your voice again after changing the setting.
Physical Fixes That Make a Bigger Difference Than Any Setting
Software settings can only do so much. Sometimes the biggest improvements come from simple physical changes that cost nothing.
Move Your Mouth Closer to the Microphone
This is the single most effective fix for a quiet microphone, and it requires zero settings changes. The relationship between distance and volume is dramatic:
- At 50 centimeters, your voice reaches the mic, sounding weak and surrounded by room noise.
- At 20 centimeters away, your voice is noticeably stronger and clearer.
- At 10 centimeters away, your voice sounds full, warm, and present.
If you are using a laptop with a built-in mic, lean toward the screen when you speak. If you have a desktop mic on a stand, move it closer to your mouth or reposition yourself so it’s closer to your mouth.
Check for a Physical Mute Switch or Button
Many microphones, headsets, and audio interfaces have a physical mute button or switch. These are easy to accidentally activate without noticing:
- Look carefully at your microphone for any buttons, switches, or toggles
- Check your headset cable for an inline volume or mute control
- Look at any audio interface or mixer you are using for mute buttons
- Check your laptop keyboard for a microphone mute key, often shown as a mic icon with a line through it
- On some laptops, this is a function key combination
A physically muted microphone will never respond to software fixes, regardless of how high you set the volume.
Check for Physical Obstructions
Something as simple as a piece of fabric, a sticker, a laptop bag, or even dust can muffle a microphone:
- Look at the microphone opening and make sure nothing is covering it
- Gently blow any dust away from the mic opening
- If your laptop has a case or skin on it, check that it is not covering the mic hole
- Remove any covers or accessories that might be blocking the microphone
How to Boost Mic Volume Without Losing Quality
Boosting microphone volume always involves a trade-off between loudness and audio quality. Here is how to get the most volume with minimal impact on sound quality.
Use a Pop Filter and Get Closer
Rather than boosting volume electronically, getting physically closer to your microphone is a cleaner way to increase perceived loudness. A pop filter lets you get much closer to a condenser mic without the popping sounds that proximity causes. This gives you a louder, richer sound without adding any noise or distortion.
Use Free Software to Boost and Enhance Your Mic
Several free tools can significantly boost and improve your microphone volume through software:
- Krisp is a free app that not only removes background noise but also normalizes and boosts your voice level. It works as a virtual microphone that any app can use
- NVIDIA RTX Voice offers similar noise removal and volume leveling, and is free for anyone with an NVIDIA graphics card
- Voicemeeter is a free virtual audio mixer for Windows that gives you detailed control over input gain, equalization, and compression. It is more complex than Krisp, but extremely powerful once you learn it
- Adobe Podcast Enhance Speech is a free web tool where you upload an audio file, and it automatically improves the volume, clarity, and quality using artificial intelligence
Apply Compression to Even Out Your Volume
Compression is an audio processing technique that automatically reduces the loudest parts of your voice and increases the quietest parts, resulting in a more consistent and present sound. Many podcasters and streamers use compression on their voice to sound professional and easy to hear.
Free audio software like Audacity has a built-in compressor effect that you can apply to recordings. Some virtual audio tools, such as Voicemeeter, also apply real-time compression during calls.
Why Your Mic Volume Changes During a Call
Some people find that their mic starts at a good volume but then becomes quieter or inconsistent mid-call. This is almost always caused by one of these things.
Automatic Gain Control Is Adjusting Your Level
Most meeting apps use Automatic Gain Control, which continuously monitors your audio level and adjusts it in real time. When this works well, it keeps your voice consistent. When it works poorly, it can cause your volume to fluctuate in ways that confuse and frustrate listeners.
The fix is to disable automatic gain control or automatic volume adjustment in your meeting app settings and set your level manually as described in the earlier sections of this guide.
Your CPU Is Overloaded
When your computer is working very hard, audio processing can suffer. A high CPU load can cause audio glitches, volume drops, and distortion. If your mic sounds fine at the start of a call but degrades as the meeting goes on, close any unnecessary apps and browser tabs before your next call to free up processing power.
Your Internet Connection Is Compressing the Audio
When your internet connection is slow or unstable, meeting apps often compress your audio heavily to reduce bandwidth usage. This can make your voice sound quieter and thinner, even if your mic settings are perfect. Check your internet connection speed before important calls and consider using a wired Ethernet connection rather than WiFi for more stable audio.
How to Test Your Microphone Volume Before Every Meeting
Getting your volume right is only useful if you verify it before each call. Here is a simple testing routine that takes less than 3 minutes.
Three Minute Pre-Meeting Audio Check
Do this before any important call:
- Open your meeting app settings five minutes before the call starts
- Confirm the correct microphone is selected from the input device list
- Run the built-in microphone test if your app has one
- Speak at your normal volume and watch the input level meter
- Aim for the meter to sit at around 60 to 70 percent of maximum during normal speech
- Listen to the playback and confirm your voice sounds clear, close, and natural
- Make any final adjustments and then join the call with confidence
Conclusion
Low microphone volume can be frustrating, but it is almost always fixable with the right approach. By systematically checking your hardware, operating system settings, and app-specific controls, and by making simple physical adjustments, you can ensure your voice is clear, loud, and consistent in every call or recording. Regular testing and small preventive habits will save you time, reduce frustration, and help you come across as professional and prepared every time you speak online.